

Setting powder is a beauty essential that we would not be without. Seriously, on a recent vacation, when we realized we had forgotten setting powder, a pit formed in our stomach. It may seem dramatic, but our beat isn’t as smooth, seamless, or long-lasting without it. Consider the vacation photos…
If you’re not (yet) a ride-or-die setting powder fan like us, let us explain the basics, how to use setting powder correctly, and all of our pro makeup techniques that will take your entire look to the next level. Consider this a setting powder masterclass.
What is Setting Powder?
A setting powder is a finely milled powder used to set liquid complexion products, but it can do a lot more. MORE! A excellent setting powder extends the life of your makeup, reduces midday shine, and gives your skin an airbrushed appearance. It can also be used to highlight your cheekbones, contour your nose, and elevate your face. There are normally two sorts of setting powder: pressed and loose, but we’ll get into those details in a minute.
How To Use Setting Powder:
Setting Powder Tip #1: Find the Right Formula.
Let’s get right to it: you have the option of loose or pressed powder, and each has its own set of perks. Here’s how they differ, so you can choose the best formula for your daily requirements.

A loose setting powder is a finely milled powder (the finer the better) that blends and melts effortlessly with your makeup, increasing lasting power and providing a smooth-skin finish. The Huda Beauty Easy Bake Loose Setting Powder, $35, is our go-to since it smoothes and snatches like no other; it also comes in eight hues, so you can select one that blends seamlessly with your makeup.
How to Use Loose Setting Powder: She is a multitasker, to say the least. Choose a little dusting of powder to set, smooth, and mattify your makeup, or use loose powder to bake your makeup, which involves applying a heavy layer to different regions of your face to brighten and sculpt.
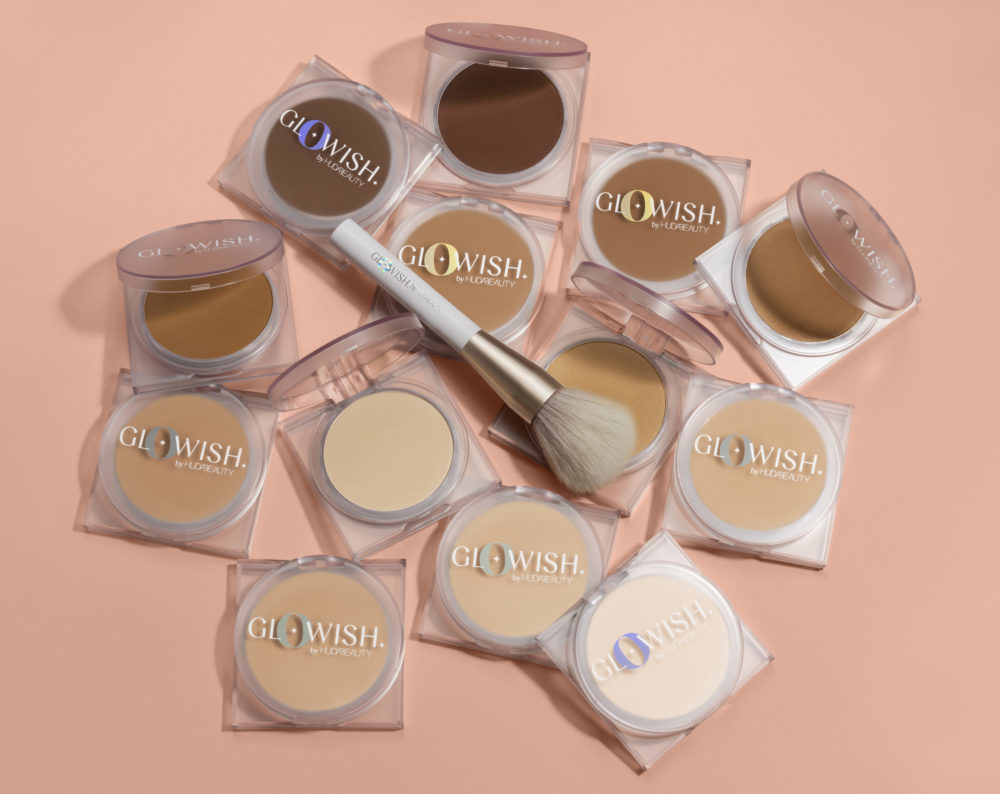
Pressed setting powder is (as the name implies) pressed, finely milled powder that provides a gentle veil of coverage and often has a softer, more natural finish than loose powder. It’s also useful for mattifying touch-ups on the move, smoothing skin texture, and extending the life of cream formulas. Wear pigmented pressed setting powders alone or over your other complexion products.
The GloWish Luminous Pressed Powder, $33, is usually our first choice since it gives your skin a gorgeous natural glow and is loaded with hydrating elements like Damescana rose oil, which keeps it from feeling dry. Because it contains pigments, you may use it instead of foundation with a medium-dense, large fluffy brush on no-makeup days – we’re obsessed. You might also try Charlotte Tilbury’s Airbrush Brightening Flawless Finish ($49), which comes in two transparent hues for setting makeup.
Setting Powder Tip #2: Choose the Correct Setting Powder Shade
Finding the proper hue for any complexion product is similar to cracking a cheat code. While many loose powders are translucent, some can leave a white cast, so always choose a shade that fits your skin tone. It’s also worth noting that depending on the outcome you want, you may need different hues.
For example, if you want to brighten and bake your undereyes or beneath your cheekbones, use a hue that is two to three shades lighter than your complexion. Pink powder, such as our Easy Bake Cherry Blossom shade, is perfect for brightening fair to medium complexion tones, while yellow powders, such as the Easy Bake Banana Bread shade, produce the most striking brightening results for medium to rich skin tones.
If you want to set your look with a natural finish, choose a pressed powder in a shade that matches your foundation. Check out our shade guide.
Setting Powder Tip #3: Find the Right Tool.

When it comes to setting powder, there are so many various tools you can use to get the effect you want, but these are the three things we always grab for:
A loose fluffy brush is a multipurpose tool. She may be used to apply a light dusting of powder to your beat to set and add coverage, as well as to mattify areas that tend to shine, such as your T-zone. She’ll also assist you remove excess powder from your makeup by baking it.
A damp makeup sponge is required for baking since it helps you to take up enough powder to bake. Check out our Basic B Sponge, $17, which helps to properly deposit the powder onto your skin for a more seamless finish. You may also use a damp makeup sponge to apply loose and pressed powders to your skin for an airbrushed look.
A powder puff: The powder puff has made a significant comeback, and we STAND by it. It may be old school, but it helps you to massage powder into your skin for a smoother, airbrushed look. It’s also an excellent baking companion.
Setting Powder Tip #4: Prepare Your Skin for Powder.
We understand that there is a lot of information, so we’ll keep it brief: if your skin is dry or you haven’t exfoliated recently, your setting powder is more likely to settle into fine creases or crease in smile lines, making your face appear dry and flaky rather than smooth.
To avoid this, exfoliate your skin on a regular basis to ensure a smooth surface for application. Of course, for this stage, we always use the WISHFUL Yo radiance Enzyme Scrub, $39, which contains papaya and pineapple enzymes to eliminate dead skin and boost your radiance. J’adore!
The next phase is hydration. The WISHFUL Eye Lift and Contour Peptide Serum, $45, is great for the undereye area because it’s lightweight and moisturizing while also tightening the area for a smooth finish. Then, we seal in all of that glazed, juicy deliciousness with the WISHFUL Honey Whip Peptide Moisturizer ($43), which is filled with nourishing manuka honey and restorative peptides and makes the ideal canvas for makeup.
Setting Powder Tip #5: Lay Your Complexion Base Perfectly

Setting powder is used to set cream formulae, so make sure you have a creamy formula for your powder to grab onto, and that these formulas are buffed and blended to perfection. We recommend bouncing a damp makeup sponge over your complexion at the end to ensure that your products are completely blended and free of brush strokes. It will also remove any surplus formula that could result in caking.
We adore the Huda Beauty #FauxFilter Luminous Matte Concealer, $29, for a cake-free and snatched base since it’s easy to build and modify the coverage while also being lightweight and without causing creases or looking cakey. Talk about ticking all of the right boxes!
Tip #6: Use Setting Powder to Bake.
Baking is one of our favourite makeup tricks. Apply a heavy layer of loose setting powder over your cream complexion products. It is commonly used to brighten the undereye area, but you may also bake your chin, nasolabial folds, and the center of your forehead to set your makeup – in other words, any parts of your face where makeup tends to crease or is oily.
How to Bake: Using a moist makeup sponge or powder puff, apply a generous amount of loose setting powder to the areas you wish to bake. Allow the baking powder to remain on your skin for three to five minutes before sweeping out the excess with a loose, fluffy brush. What is the end result? A budge-proof rhythm that .
Tip #7: Use Setting Powder to Snatch

Now that we’ve covered the fundamentals of baking, let’s move on to the real deal. If you’re a TikToker, you’ll get it *wink wink*. When properly applied, a loose setting powder (in your brightening tone) can be utilized to sculpt the natural features of your face for a more sculpted, lifted finish that lasts from day to night. You don’t even need to contour!
First, apply your brightening concealer to the inner and outer corners of your undereye area, as well as a line under your cheekbone from the outer corner of your lips. After you’ve blended your concealer, apply your loose-setting powder with a damp sponge or powder puff. Wait three to five minutes before dusting off the extra powder with a fluffy brush. Et voilà! You were taken.
Setting Powder Tip #8: Apply Setting Powder to Control Oil
If you have oily or mixed skin and are prone to noon shine, setting powder is your best friend forever. Simply use a loose or pressed powder and a large fluffy brush to lightly dust your entire beat. Alternatively, for a more glowy base, simply apply powder to your T-zone.
If you need to touch up throughout the day, keep a pressed powder in your purse with a powder puff and use it to mattify your complexion while on the go.
Setting Powder Tip #9: Apply Powder To Your Undereyes
Instead of baking, use setting powder to softly set your undereyes. Dip a small round, medium-fluffy brush in powder and gently push it into your undereyes. This prevents creasing, brightens, and sets, and it complements a no-makeup makeup look more naturally.
Setting Powder Tip #10: Apply Setting Powder to your Lids
If your eyeshadow or other cream products on your lid are prone to creasing, setting powder will (as advertised) save the day. All you have to do is use a little fluffy brush to coat your entire lid with setting powder after applying cream products and before adding eyeshadow. This will soak up any excess oil, keep your shadow from creasing, and increase its lasting power.
Pro tip: For brighter eyes, add a small layer of concealer to your eyelid – literally, any surplus product on your makeup sponge or brush – before setting with powder.
Setting Powder Tip #11: Apply Setting Powder to Your Pout.
We discovered this lip-setting technique thanks to Mario Dedivanovic, well known as Kim’s MUA. Applying a little coating of setting powder over lipstick ensures that it remains smudge-proof no matter what you do.
How to: After applying matte lipstick, use a densely packed flat brush to pack the translucent powder onto your lips. Allow it to set for three to five minutes before dusting off the excess powder. Finish with a last layer of color by dabbing the lip with lipstick.